Air Spin Bike - Troubleshooting monitor issuesUpdated 5 months ago
Many monitor issues can be corrected by some simple procedures such as checking the battery or cable is inserted correctly. Follow this troubleshooting guide if the monitor on your Air Fit Bike is experiencing any of the following issues. You may be required to complete these steps before making any warranty claims on the Air Fit Bike.
- Cracked screen / stained screen / scrambled monitor readout
- Monitor will not power on when you press any button on the monitor
- Monitor only powers up when bike is being ridden
- Monitor turns on but does not record workout activity
Issue: Cracked screen / stained screen / scrambled monitor readout
A common cause of physical damage to the monitor screen is cleaning with water or cleaning agents using an excessive amount of liquid or spray bottles. This will cause visible damage to the console and LED display. This is not covered under warranty, and will require a monitor replacement. Please contact [email protected] for support on replacing a damaged monitor.
Issue: Monitor does not power on when monitor buttons are pressed
Check the supplied battery is inserted into the terminals in the rear of the monitor. If the battery is inserted correctly, and the monitor still does not turn on when you press a button, the battery is flat and needs replacing.
***Please note*** When your bike is brand new, the monitor ships with the battery in a storage compartment in the rear of the monitor. You must remove the battery and place it into the terminals in the rear of the monitor, which is next to the storage compartment.
Issue: Monitor only powers up when bike is being ridden
Check the supplied battery is inserted into the terminals in the rear of the monitor. If the battery is inserted correctly, and the monitor still does not turn on when you press a button, the battery is flat and needs replacing.
***Please note*** When your bike is brand new, the monitor ships with the battery in a storage compartment in the rear of the monitor. You must remove the battery and place it into the terminals in the rear of the monitor, which is next to the storage compartment.
Issue: Monitor turns on but does not record workout activity
Step 1. Check the monitor connection. On the underside of the monitor, you will find the cable plug. Unplug the cable, check for debris / dirt and clean the plug. Do not use water, use an alcohol cleaner. Fully dry the plug and reinsert plug into the console. Ensure plug is fully inserted.
Image 1 - Monitor Plug
Step 2. Retest the console. With the console screen turned off (wait for screen to timeout), begin peddling the bike. If cable is connected correctly, the monitor will power on and begin recording your activity. If so, the monitor is functioning correctly. No further steps required. If still not working, move to step 3
Image 2 - Monitor recording workout after cable adjustment
Step 3. If after peddling the screen does not turn on OR stays in standby mode (see image 3), check the cable connection to the generator.
Image 3 - Monitor in standby mode
3.1. Trace the monitor cable back to the generator unit on the bike frame. (See image 4)
Image 4 - Monitor cable running down to generator
3.2 Use an allan key to remove the two screws on the top of the generator unit, then lift out the unit and seperate the generator unit from its cover (See images 5, 6 & 7).
Image 5 - Allan key removing two screws
Image 6 - Remove the unit from the frame
Image 7 - Generator unit separated from its cover
3.3 Now that the generator unit is freed from the cover, inspect the cables. There are two cables, ensure both are securely attached to the their sockets. (Image 8)
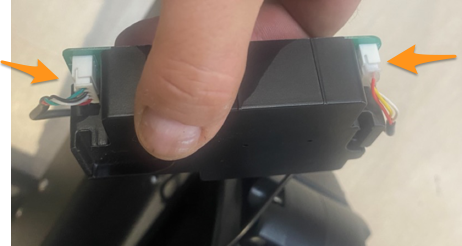
Image 8 - Check cables are secure
3.4 Inspect the magnetic strips on the side of the generator unit (Image 9). Look for signs of rubbing on the fan. If there are signs of rubbing, the generator unit is positioned too closely to the fan on the bike. When replacing the unit back on the bike, ensure enough clearance.
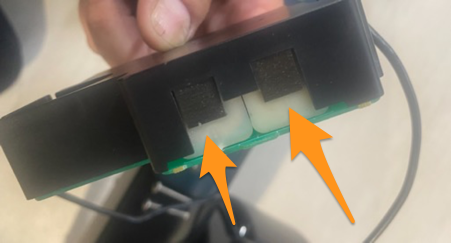
Image 9 - Check the two magnetic strips for signs of rubbing / contact
3.5 Re-assemble the generator unit back into the housing cover and re-attach to bike with the allan key and screws. When re-assembling, ensure the cable is not pinched under the housing, and is being fed through the cable feed notch as per image 10 shown below.
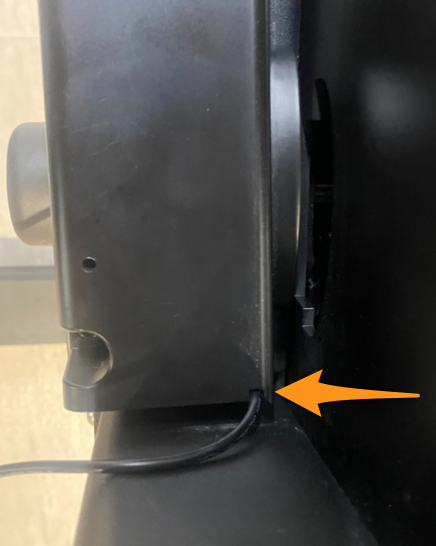
Image 10 - Correct cable alignment
3.5 - Return to Step 2 and retest the monitor, starting with the monitor off before beginning test. If successful, the issue was a loose connection and the issue is resolved.
If not successful, please replace the following parts in this order until the issue is resolved. Spare parts are available from SMAI please contact [email protected]
1. Replace sensor cables
2. Replace generator unit
3. Replace monitor
These parts may be supplied under warranty if applicable. Contact [email protected] to discuss.